Kandria Editor
Kandria ships with a very capable level editor which allows you to modify existing worlds and create your own. This document describes how to use the editor, for information on how to distribute your worlds and manage those of others, please see the mods documentation.
Opening the Editor
You can open the editor by loading into a world in edit mode directly from the mod manager, or by pressing the Section / Tilde / Grave Accent key (the one immediately below Escape), or the F2 key at any time during gameplay.
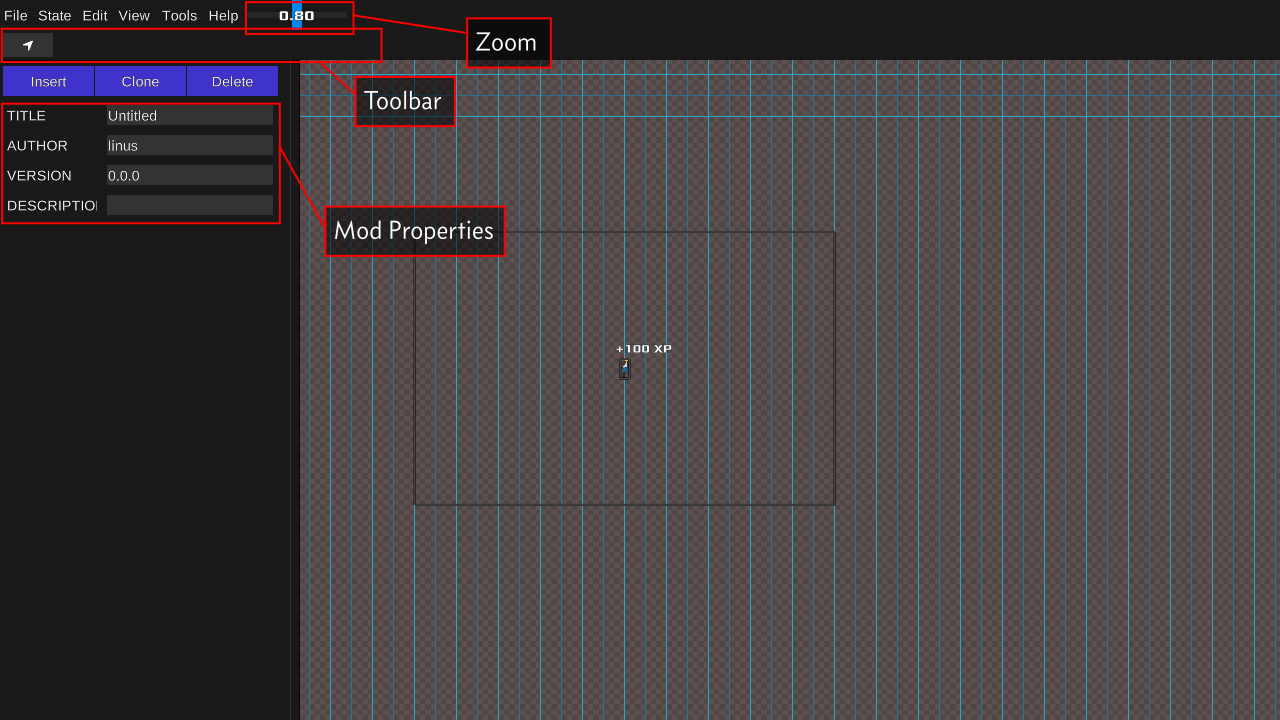
At the left is where properties for objects will appear. It should automatically "select" the world you created and allow you to set its name, description, etc. Above it lies the toolbar and the menu bar. If you want to quit the editor, you can either hit the Section key again, or go to File > Close Editor.
Browsing and Selecting
When the world is selected, clicking anything inside the view with a bounding box will cause that entity to be selected. If you don't click on anything, you'll instead pan the view. While an entity is selected, you can either hold Alt at any time to drag the view, or select the Browse tool at the top left in the toolbar to explicitly browse.
To change the zoom level of the editor view, you can drag the slider to the right of the menu bar.
If you want to change which entity is selected, you can hit the Tab key, which will select the world again, or simply double-click on another entity.
Editing Entities
After selecting an entity such as the player, you'll be presented with a new set of properties on the left that you can edit, and a new set of tools. The editor will also automatically switch to whichever tool is the default tool for that entity.
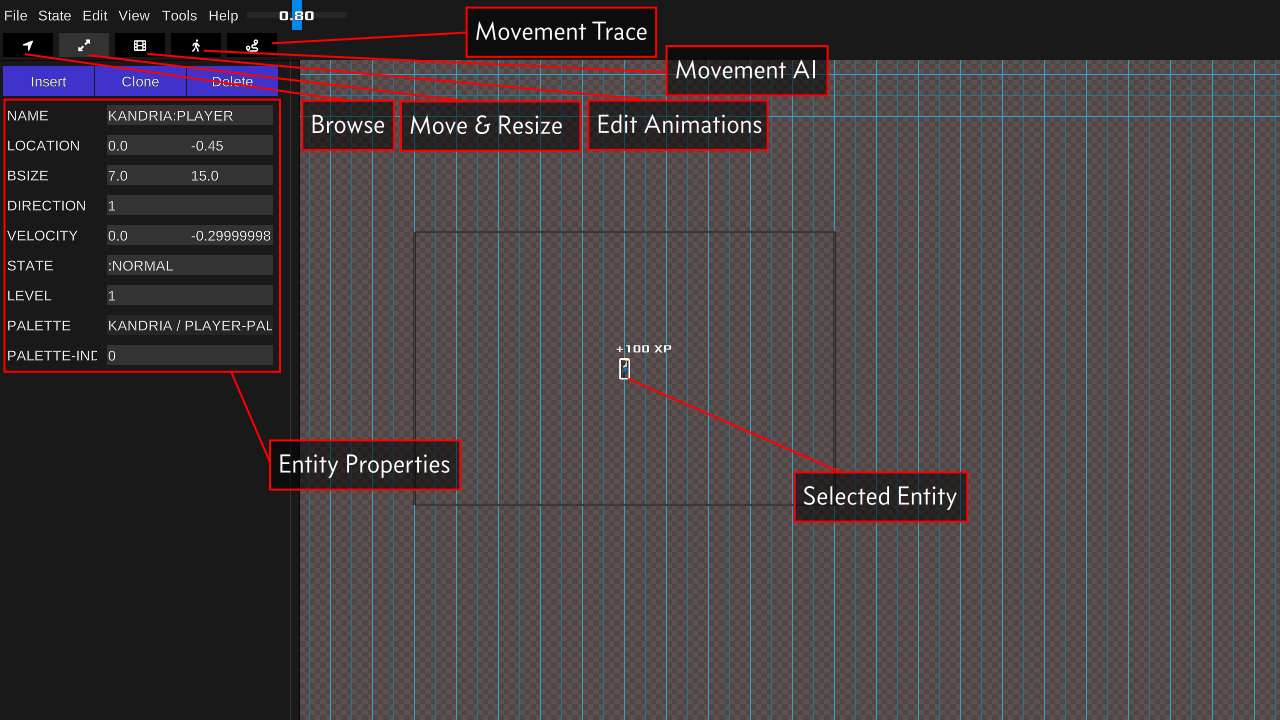
Some entities have different sets of tools available, too. For instance, the Trace tool is only available for the player.
The tools shown in the screenshot above do the following:
BrowsePan around the view without holdingAlt. If you holdShiftyou can also control the zoom level.FreeformAllows you to move any entity by dragging it. Entities that are resizable can also be resized by dragging their edges.AnimationsOpens the animation editor for NPCs and so on. Unless you are making complicated mods with custom characters, you will not need this tool.Movement AIAllows you to debug pathing issues with NPCs. If you click somewhere it'll invoke the movement AI to plan a route to where you clicked, if it can.Movement TraceOnly available for the player – shows the movement trace like it does on the in-game map.
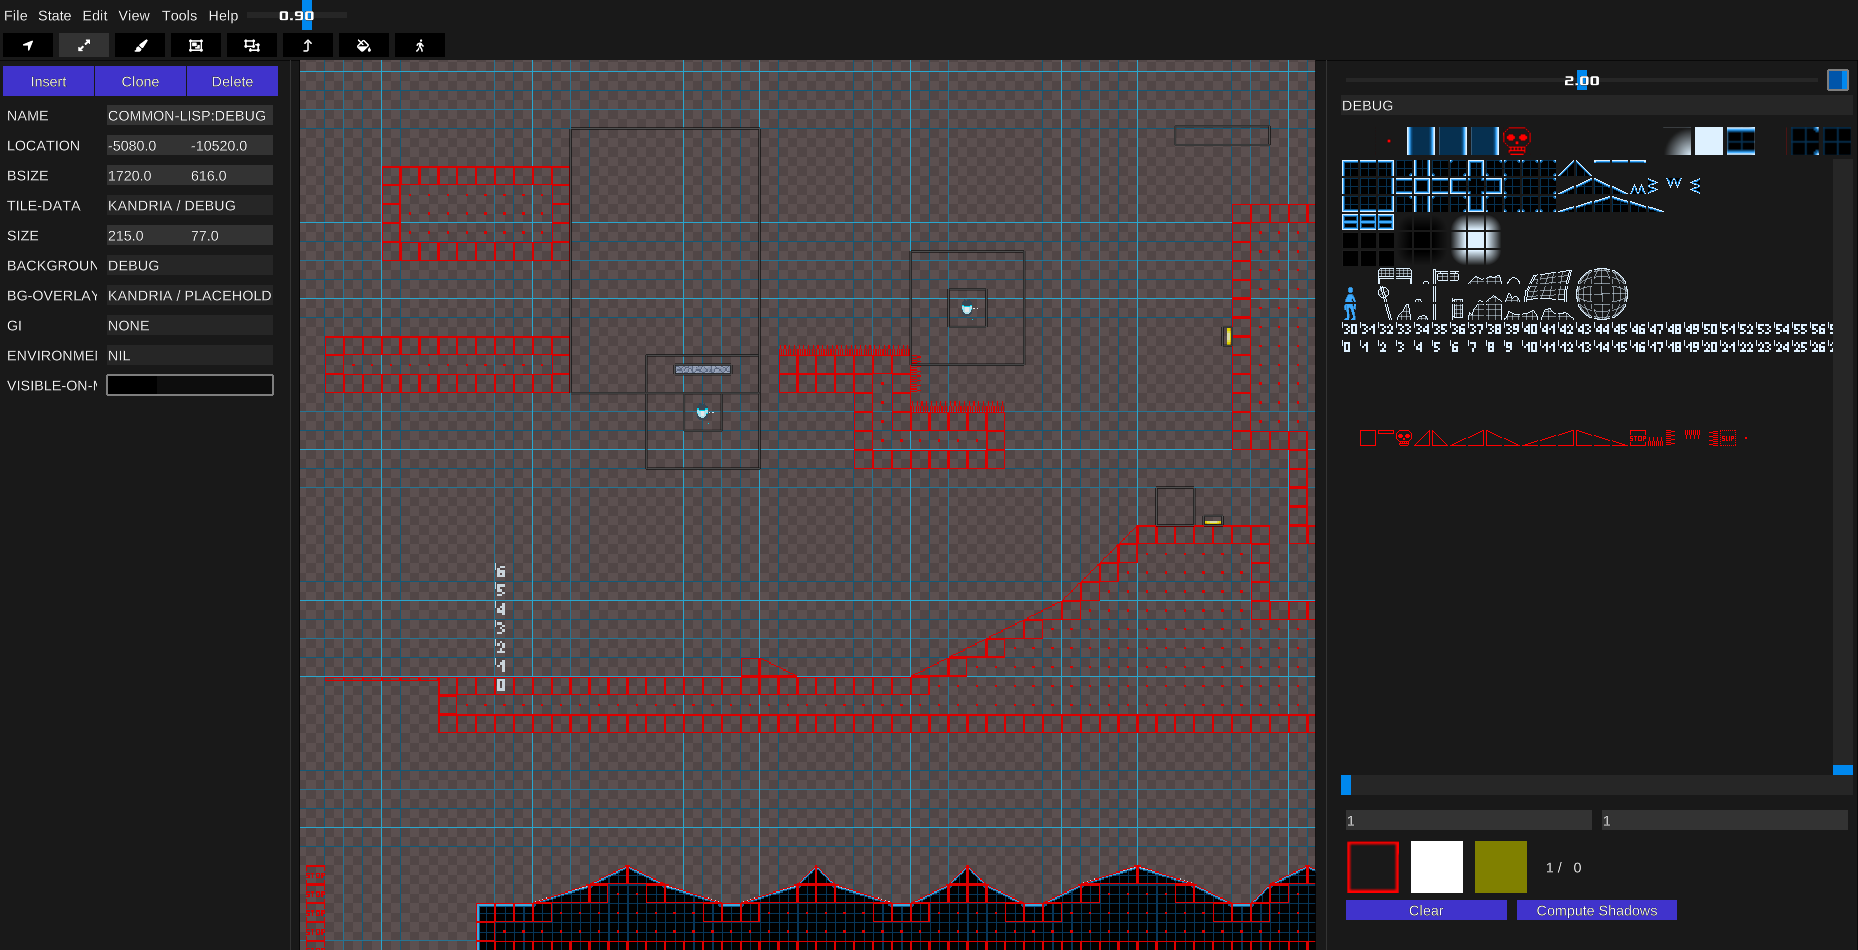
Editing Chunks
After selecting a "chunk" (a screen displaying tiles), the editor will also show you a new side panel. This is one of the most complex of the editor tools, so take your time to get familiar with it.
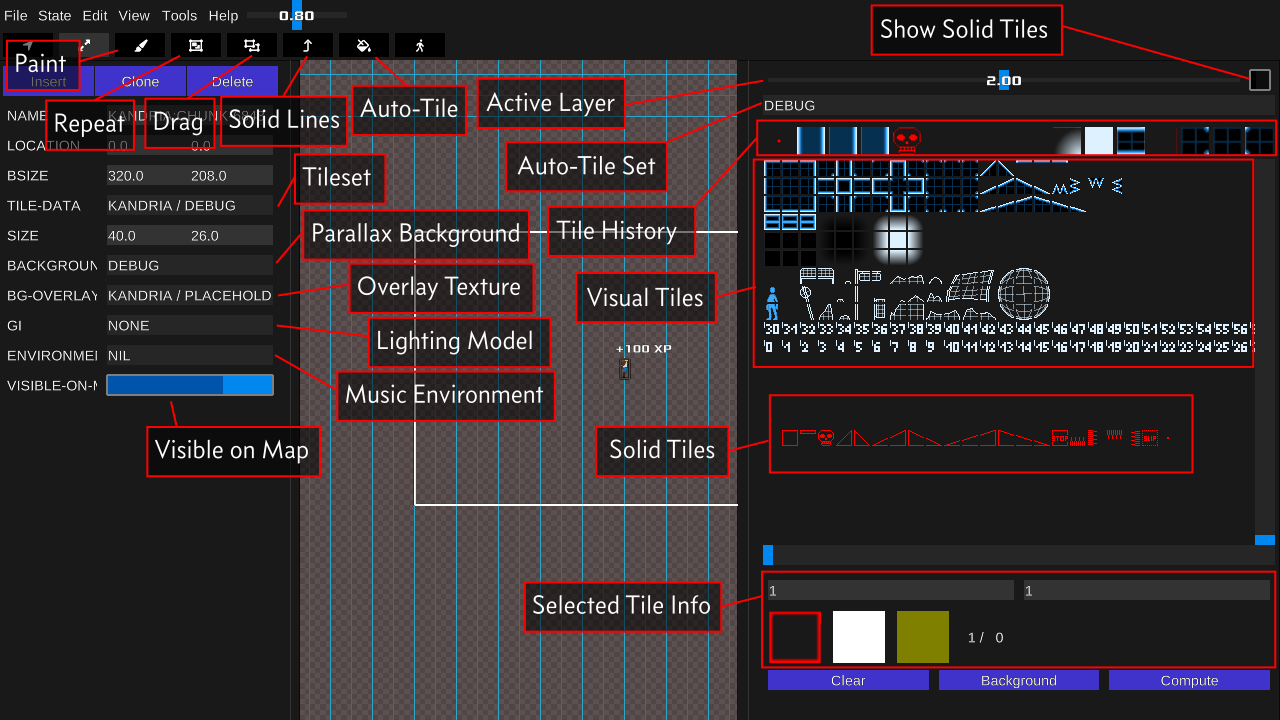
In terms of tools there's now a few more available:
PaintFreely paint tiles onto a layer of the chunk. Right click to erase, middle click to pick a tile from the chunk. Scrolling will scroll through the tileset horizontally,Shift-scrolling will do the same vertically.Shift-clicking will bucket-fill the area,Ctrl-clicking will fill with "inside" solid tiles and auto-tile the chunk.RepeatPaint tiles but repeat them nicely. Useful for stamping down bigger things that span more than one tile or painting rectangular regions. HoldShiftto only place down whole spans of tiles, rather than parts. Middle click to pick the tile at the cursor.DragSelect a region of tiles and move it. HoldShiftduring the move to copy it.Solid LinesDrag a line of solid block outlines. This will automatically insert slopes as appropriate, as well, making it trivial to draw up the solid base of a map. Right click to erase.Ctrl-click to bucket fill with "interior" tiles and do an auto-tile pass.Auto TileAuto-tile a region of tiles with the currently selected auto-tile set. You drag to select the region to auto-tile, which allows you to mix different tilesets quickly and easily.
The useful properties shown on the left are as follows:
TILE-DATAUse this to select which tileset you want to use. You can only use one tileset for each chunk.BACKGROUNDThis lets you select which parallax background is displayed in the back.BG-OVERLAYSome tilesets have special background tiles that have pink bits. Those pink bits are replaced with the overlay texture to allow for more variation in the background. You can select the texture to be used here.GIThis sets the lighting model used for the chunk. They change how the entire chunk is lit, and can also change where the light is coming from. Most of these will have the light originating from the player.ENVIRONMENTControls the music and soundscape that plays when entering this chunk.VISIBLE-ON-MAP-PControls whether the chunk will show up on the map or not. Useful for handling interior chunks.
NOTE: Unfortunately you cannot add new tilesets, backgrounds, etc. without involving code. For that, please see modding.
On the right is the tile control panel. This controls how you paint and interact. At the top is the layer slider, which controls which layer to paint on:
0- The tile background layer. This is also the layer theBG-OVERLAYapplies to. It also has its own auto-tiling mode specifically for background tiles.1- An intermediary background layer.2- The "surface" layer where surface tiles, the player, and so on reside. Note that tiles on this layer will still draw over the player.3- An intermediary foreground layer.4- The foreground layer.
To the right of the layer slider is a toggle that shows or hides the layer of solid tiles. All of the other layers are visual only, and the solids layer defines how entities interact with the chunk geometry.
Below this is the box to select the currently active auto-tile set. Some tilesets will have multiple auto-tiling sets available that you can mix between.
Right below this is the recent tile history. When you select new tiles they will appear in this history and give you easy access to previously used ones.
Below that is the actual tileset. Every tileset is split into two parts: the top part composes all visual tiles. These tiles do not have any interactivity and can be freely placed on layers 0-5. The bottom row is always reserved for solid tiles, which define interactivity and can only be placed on the solids layer. Picking a solid tile will automatically switch to the solids layer and vice-versa. The solid tiles have the following behaviours:
Solid block. This block is solid on all sides and defines the surface geometry.
Platform. This block can be jumped up on and jumped down through, but can also be walked on.
Death. This block will kill the player on contact.
Slopes. The player can jump through these from below, though usually they're used together with solid ground.
Stopper. This is a marker tile used to define elevator floors and prevent enemies or NPCs from escaping outside their intended areas.
Spikes. These are directional spikes, and the player can pass through them when facing the same direction.
Slip block. This block is solid but cannot be climbed.
Inside. This tile marks the "inside" of a geometry and behaves the same as a solid block. It is used by the auto-tiler to determine which parts are inside or outside.
If you want to select more than a single tile, you can do so by clicking one corner, then shift-clicking the other. This will select the whole region of tiles between the two clicks.
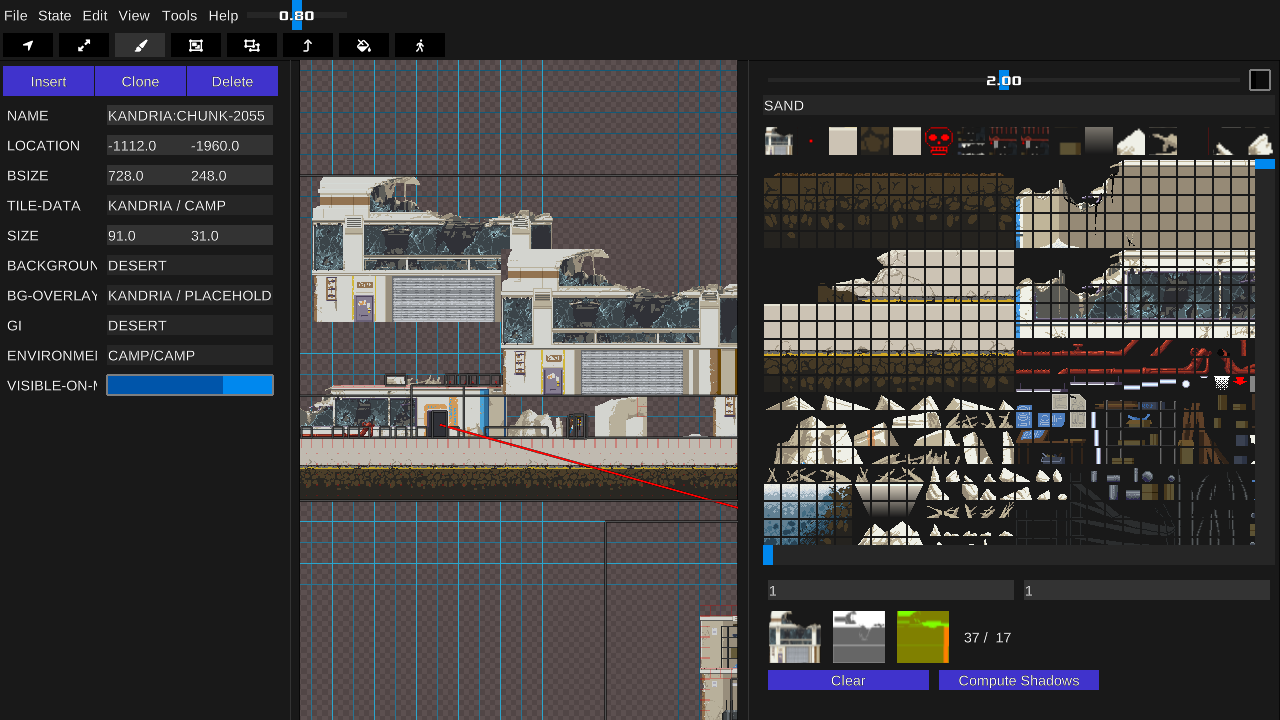
Below the tileset is information about the currently selected tile. You can see the size of the stamp in tiles, the albedo, absorption, and normal maps, and the index of the selected tile.
Inserting Entities
If you need to add new elements to the world you can use the Insert button. It'll pop up an entity creator, with a list of all creatable types.
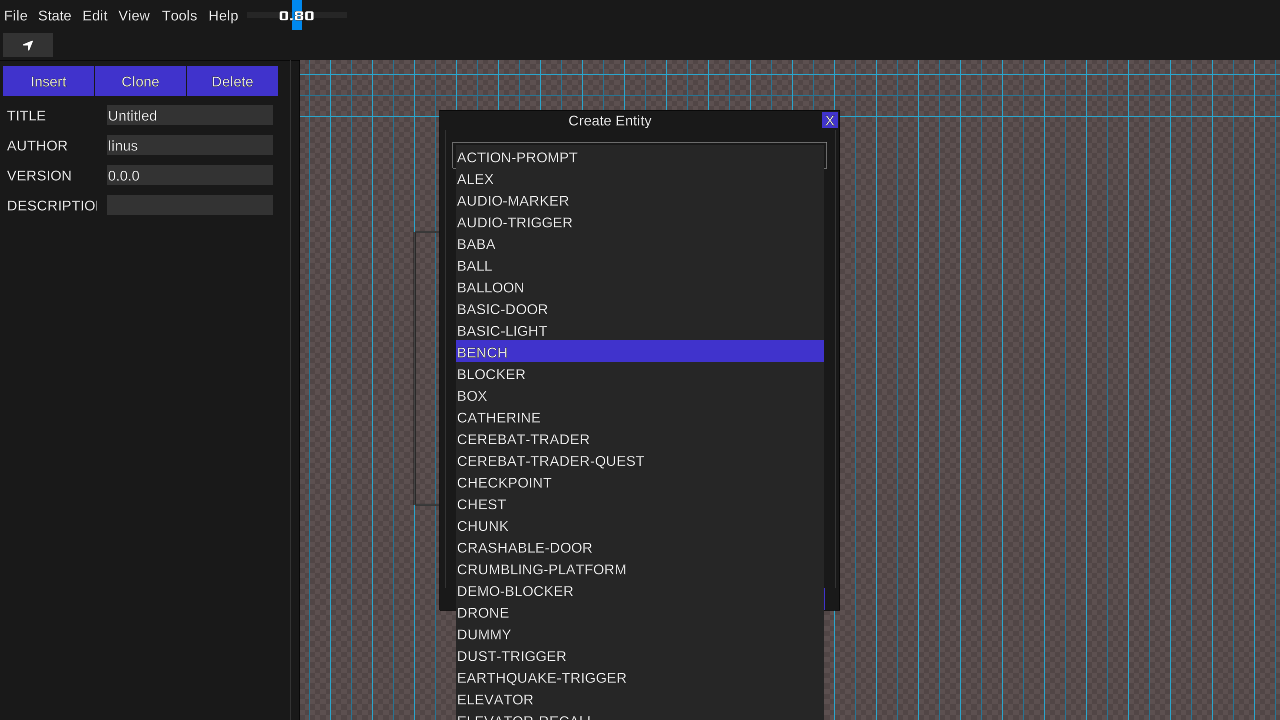
After selecting a type, click OK, and it'll be inserted in the middle of the view and automatically selected. Here's a list of some particularly useful types:
World Construction
basic-doorA simple door to pass through. When you create one, it'll also always create a matching target door. Just drag them where they need to be.basic-lightA simple geometrical light. Use the remesh tool to place the light vertices.chunkA chunk. All gameplay needs to happen within chunks.hiderA tile layer that hides something else. Once the player touches it, it disappears.stufferA tile layer that lies outside chunks to smooth over camera pans.textured-lightA light that uses a texture instead of a polygon.
Triggers
checkpointSaves the location for platforming respawns.save-pointA save point telephone for hard saves.shutter-triggerWhen entering this trigger while enemies are present within it, will close the associated shutters. Increase itsCHILD-COUNTto create shutters.spawnerGeneric spawning trigger volume. Activates when the player enters a chunk adjacent to the one the spawner is in.JITTER-Y-Pdetermines whether spawned entities are randomised in their height. TheSPAWN-TYPEmust be a symbol naming the type of entity to spawn, a list of types of entities to spawn, or the name of a "random draw probability distribution".windCauses wind to happen when the player enters the trigger.
Gameplay Elements
blockerA solid tile layer that can be cleared from one side.chestSpawns an item when opened.crumbling-platformA platform that starts to crumble when the player steps on it.elevatorAn elevator that is manually activated to travel up or down.elevator-recallAn interactable that recalls the associated elevator to its location when activated. You must copy the elevator's exact name into theTARGET.falling-platformA tile layer that is solid and will start to fall once the player touches it. Can be made to "fall" in any direction, and with configurable speed.fountainA timed fountain that acts as a strong spring every 4 seconds.gateA tile layer that sits in one position until all its switches are activated, at which point it moves to another. Increase theCHILD-COUNTto spawn switches. To set the open gate position, switch itsSTATEtoOPENand move it.lanternA lantern that recharges the player's dash.magmaSame aswaterbut kills the player on contact.ropeA rope that the player can climb up. Can be made to be arbitrarily long. Can also be contracted, so that it is not extended until the player interacts with it.springPropels the player up on touch.waterA rectangular water area with different physics. If you need non-rectangular regions, you need to compose it out of multiple water volumes.
Shortcuts
The editor has many keyboard shortcuts available:
TabSelect the worldF5Save to the current save stateF6Save the worldF7Load the current save stateF8Load the initial world stateDeleteDelete the current entityInsertInsert a new entityArrow KeysMove the editor.Advance time by one tick (0.01s)+Increase zoom by 0.1-Decrease zoom by 0.1BSelect theBrowsetoolCClone the selected entityFSelect theFreeformtoolHMove the selected entity to the cursor position. IfCtrlis held, move the playerLSelect theLine(solids) toolPSelect thePainttoolRSelect theRectangletoolTToggle the lightingUSelect the playerYRedoZUndoCtrl+OOpen a worldCtrl+SSave the world. IfAltis held, save the world as another fileCtrl-_Undo
Additional Tools
The menu bar also gives access to a few more useful tools:
FileNew WorldCreate a new, empty world without creating a new modLoad World...Load a world without loading a modSave WorldSave the current world stateSawe World As...Save the world under a new directory or ZIP file
StateSave StateSave over the current save stateSave State As...Save the current state to a new save fileLoad StateLoad the current save state restoring the previous stateLoad State...Load a different save fileSave Initial StateSave the current state as the initial, starting state for the world
EditSelectOpen up a dialogue to filter and select entities by nameHistoryView the editing history and undo or redo many actions at once
ViewCenter on PlayerDoes what it says on the tinFit Map Into ViewMake the entire map fit into the editor viewToggle BackgroundShows whatever parallax background the currently centered chunk showsToggle LightingToggle the illumination model on and off
ToolsRender Module PreviewUse the current view as a preview image for the world's modReload LanguageReload all files for the current language from disk
HelpDocumentationOpen this documentation page in a browser